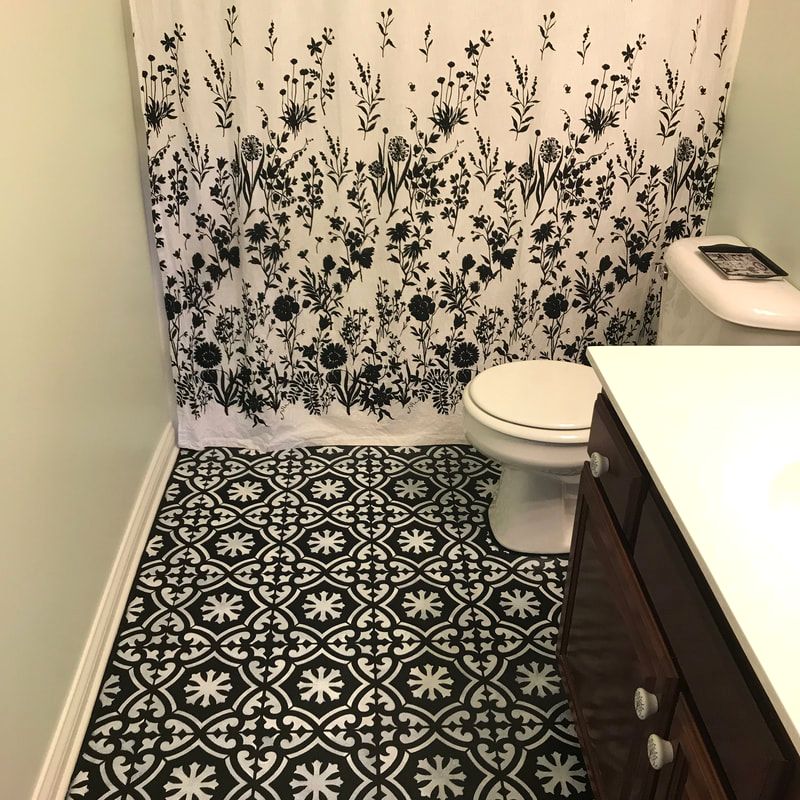
 Sometimes DIY enthusiasts will paint you a PERFECT and EASY picture of what a project will be like. Well, I'm NOT going to gloss over a home decor project (at least not this time). Truth is, stenciling our hall bath floor was difficult and ate away at all my home decor insecurities. I want to be honest with you. Hopefully, in doing so, a project like this will be easier for you! With that said, I am glad I stenciled our hall bath floor! Just look at the picture above to see the end result! However, here is an honest look at the situation: The upstairs hall bath flooring was ugly and discolored. While I had a lovely black floral on white shower curtain, playful "Spinach White" Sherwin Williams paint on the walls and little black and white decorative knobs on the vanity, the floor was an eyesore. The aged beige hue could not be hidden by bath rugs. To boot, there were areas around the toilet and shower that held the tall tell signs of gray water damage from heavy use by children. All that said, the vinyl floor was intact and without any evidence of peeling back. Still, the discoloration was horrid and really needed something new. I didn't zoom in to reveal the worst of it, but here she is: 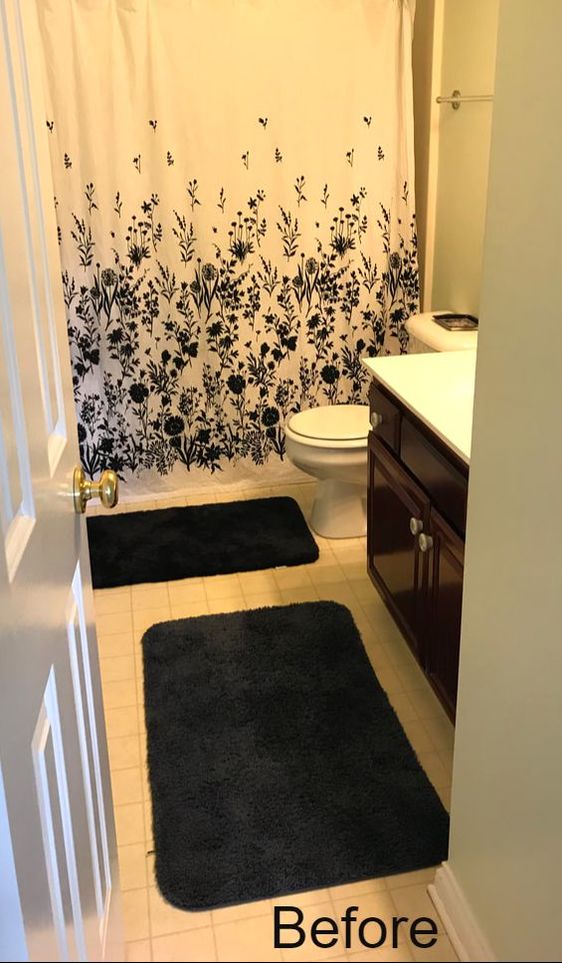 We contacted Home Depot and received a quote on mid-range vinyl plank. A light wood tone would have done the trick to give the floor a new look! However, the cost (around $1000) was not in our budget. I finally couldn't stand the way this room looked any longer! (Have you been there?!) So, I took matters into my own hands. I glanced over countless floor stenciling projects tackled by DIY enthusiasts who raved about how easy it was and how little time it took. So I rolled up my sleeves and began gathering my materials. 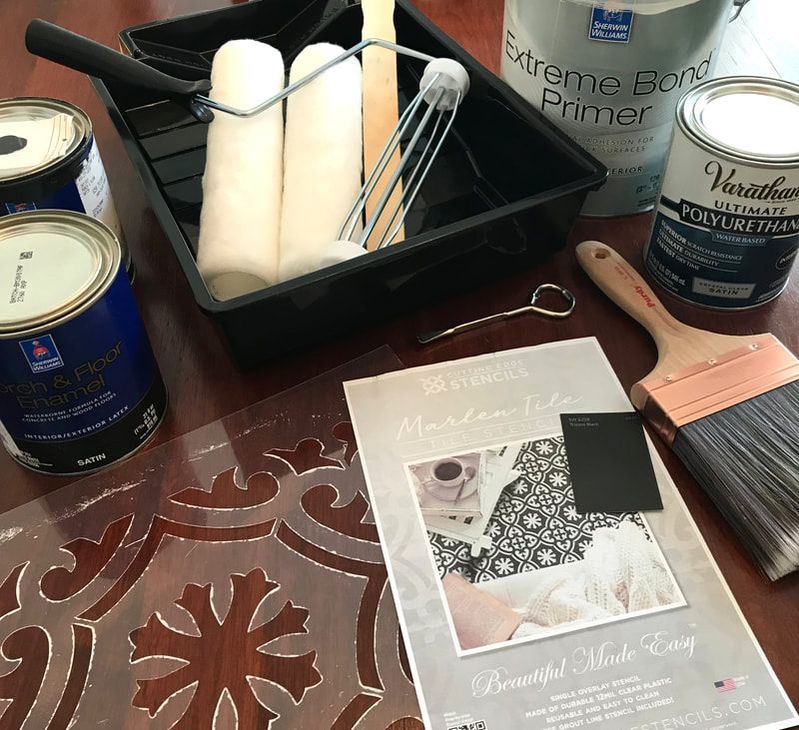 Truth is, the above picture was taken after the project was over. Gathering these supplies wasn't so easy! (But now that you know what I used, this will be so much easier for you!) Let me explain some of the obstacles I encountered: You will need a Stencil Design First, I selected a stencil design. I saw lots of beautiful stencil designs all over Instagram from Cutting Edge Stencil. Their website was well laid out and, with the assistance from their service rep, I picked out a design I was happy with (the Marlen Tile Stencil). It's important to note that since my vinyl floor square pattern was not a perfect 6 inch, 8 inch, etc., I had to custom order my stencils. (Yes, you will need two! It makes the job go smoother.) Their service rep helped me know how to measure the squares to get the correct size. They were also upfront that they couldn't guarantee the preciseness of custom orders. (Warning noted but I proceeded anyway because, I figured, if something is slightly off you can't tell unless you get on your hands and knees to inspect my floor.) I was very happy with the customer assistance and the quality product I received from Cutting Edge Stencils and I would recommend them to anyone. They also gave me instructions on the materials I would need and how to complete this project. Simple enough! You will also need: Adhesion Primer - I used Sherwin Williams Extreme Bond Primer Black Base Coat Paint - I used Sherwin Williams Porch & Floor Enamel in Satin White Stencil Paint - I used Sherwin Williams Porch & Floor Enamel in Satin Water-based Polyurethane - I used Varathane Water Based Ultimate Polyurethane in Crystal Clear Satin Along with two 3/8 inch nap paint rollers, a paint tray, painter's tape, a 1/2 inch stencil brush and a 4 inch good quality paint brush. Now starts the beginning of all my problems. I could not find the brand of Adhesion Primer recommended by Cutting Edge Stencil. I cannot remember what brand it was now but I looked high and low. It simply wasn't available in my area. I could order online, but who wants to pay shipping on a gallon of paint! So I headed to my favorite local paint store...Sherwin Williams. I love them because they are friendly and, with my coupons, I get fantastic paint for a good price. They are normally very helpful. So it really confused me and, as I said earlier, completely tapped in to all my DIY insecurities when they told me my stencil project would not work! They said the paint would peel! They told me the polyurethane would turn yellow and "pop off"! At this point, I had to make a choice. I could believe the reliable experts at Sherwin Williams, abandon my dreams and settle for a dingy floor or I could imagine that very floor being transformed into a beautiful black and white stencil bliss. Of course I chose the latter! I did listen to those kind Sherwin Williams folks a little bit and purchased their Porch & Floor Enamel Paint in Tricorn Black for the base color and also Porch & Floor Enamel Paint tinted to match my white trim for the stenciling. They said the Porch & Floor Enamel would last longer with traffic and water. However, Cutting Edge Stencil says that you can use whatever kind of paint you want for base coat and stencil paints. Then I had to get out of Sherwin Williams because, at this point, they were looking at me like I was a crazy pink and purple spotted lady from Mars who wanted to ruin her floors by painting them. I saved the polyurethane purchase for later since it is the last step. Step 1: On a clean floor use a paint roller and apply two coats of Adhesion Primer. (I always put painter's tape around and then pull it off the entire surface of my rollers before painting as this pulls away any lint.) Allow for dry time between coats per paint can instructions. Below you can see the results of my two coats. 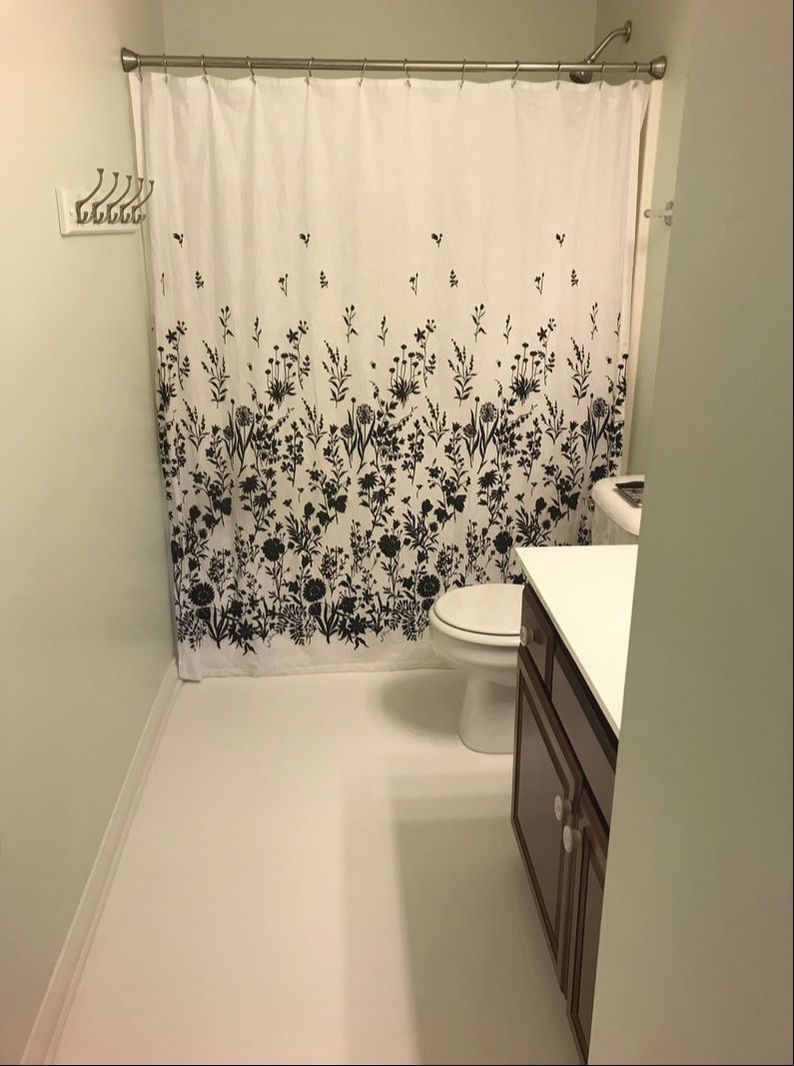 Step 2: Using a roller, apply two coats of your base color. In my case, this was the truest black tint that Sherwin Williams has available...Tricorn Black. (Allow for dry time between coats per paint can instructions.) 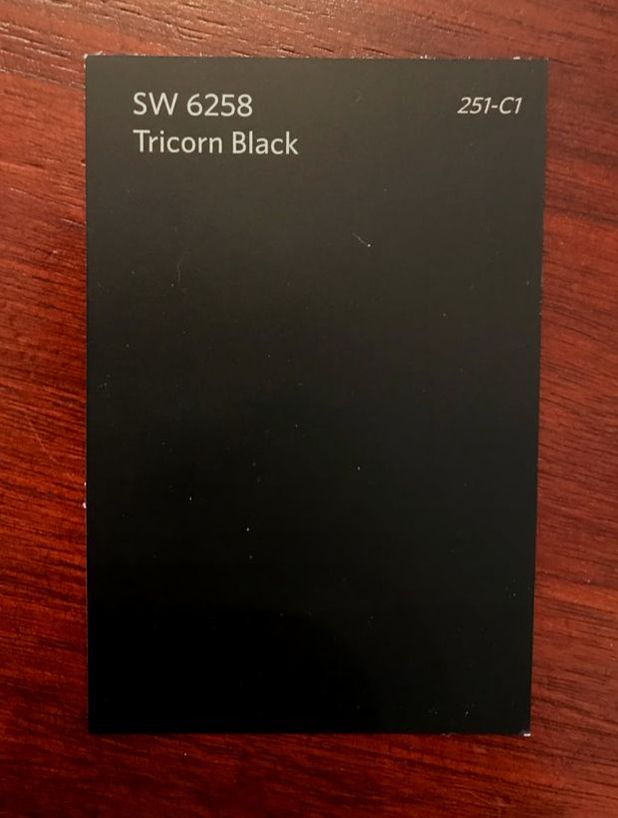 Step 3: Now for the fun part...Stenciling! Beginning in one corner, use a small amount of painter's tape to hold your first stencil down. (Start in the corner farthest from the door and easiest to get to.) You don't have to tape down every edge, just enough tape to keep the stencil from sliding around. Load a stencil brush with your stencil paint color. Dab the paint loaded stencil brush several times on a paper plate or napkin. This assures your brush is not too full of paint. A brush that is too full will cause leakage under the stencil. I use a stencil brush and not a stencil roller. Rollers may get the job done faster but stencil brushes offer more control and less errors. You may be surprised at how fast paint dries when stenciling. Stencil by bouncing the tip of the brush lightly on the floor exposed through the design openings. Do not over apply paint. The stencil paint should not look heavy but light and dusty close up. I stenciled every other vinyl flooring "square" and then went back and stenciled the in between squares once the paint had a few minutes to dry. Hopefully you purchased that extra stencil. You can alternate your two stencils or use one for flat squares and the other to bend around corners and obstacles like toilets. If you make a mistake, NO WORRIES, just paint over it with your base coat, dry and begin again. Remember, if you can't see from 5 feet up what you consider a mistake, it will not be noticeable. Honestly, between all my insecurities with my paint purchase, dry time between coats and trying to make the stencils perfect, this project took me way too long! It took two whole weeks with the kid's bathroom tied up in a painting project! Ugh! Step 4: With a great quality large paint brush, apply three thin coats of Water Based Polyurethane. (Allow for dry time between coats per can instructions.) I couldn't go back to Sherwin Williams but found the polyurethane recommended by Cutting Edge Stencil, Varathane Water Based Ultimate Polyurethane in Crystal Clear Satin, at Home Depot. The quality of brush does matter here because you don't want any streaks or ridges created by a cheap brush. I love Purdy brand. Do not apply the coats too thick or you could have the same problem. This product will go on milky but is clear when it dries. 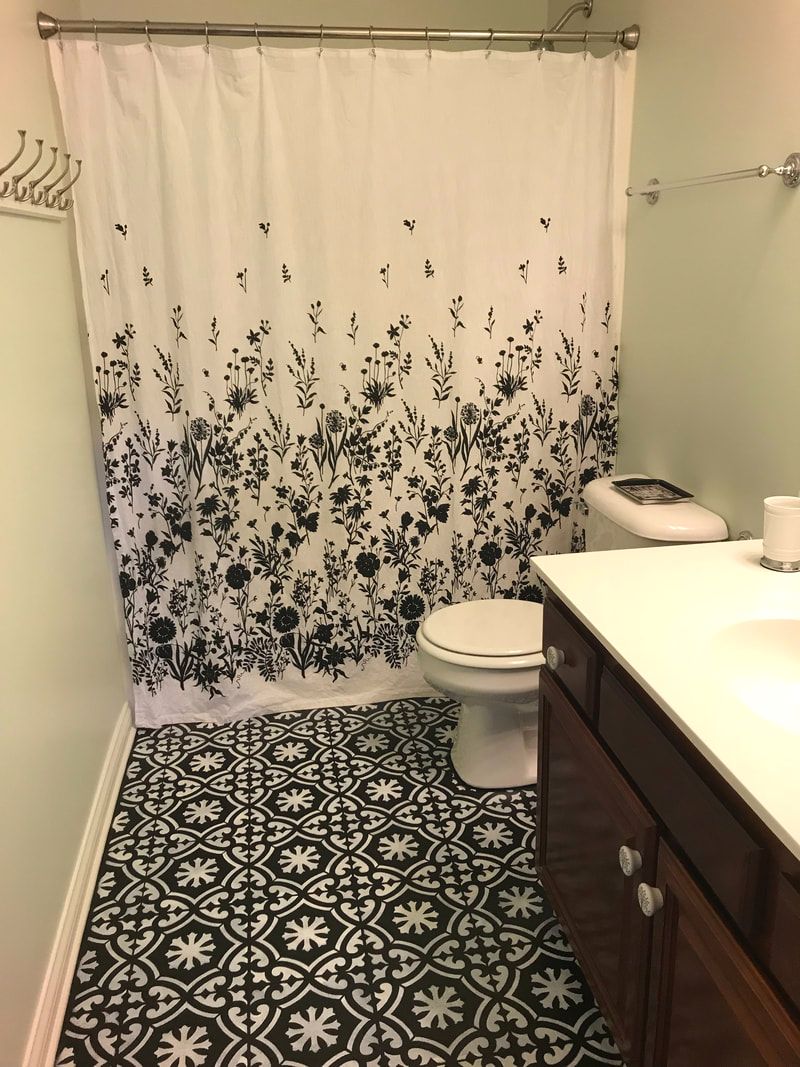 Here is the finished floor! It's been months since I completed this project and it's holding up just fine to teenage bathroom abuse. It looks the same now as the day I finished this DIY project. The total cost was around $150. My girls think it's beautiful! My husband knows I saved us a bunch of money. And, after two weeks, my teenage son sure was glad to have the bathroom back! I definitely would do it again even with the challenges along the way! 
6 Comments
10/17/2019 05:41:29 pm
The bathroom floor is a tricky thing to renovate, but I am up for the challenge. I know that it is going to be hard, but I know that we can do it. We need to try a little bit harder, but believe me, it will all pan out. I need to think about what materials I am going to use for this, so this might take a lot of time. I hope that I can make you proud and happy. 8/18/2020 10:45:15 am
3/23/2021 08:35:00 am
wow. The bathroom looks much difference. I don't prefer to use dark colors for my house. However, this case really make sense. 7/7/2021 06:41:26 am
Basically here I have found excellent services and including the effective flooring services and wood homes. The timber updates and methods for homes. 3/20/2022 06:34:18 am
The bathroom is one of the most-used rooms in a home, and discerning buyers who want a spa-like experience at home are willing to pay top dollar for a good one. But what if you plan to stay in your home? 11/25/2023 02:41:22 am
Informative piece! Loved the insights on effective floor cleaning methods and their impact on maintaining a healthy environment. Great job simplifying the complexities of floor care into actionable tips! Leave a Reply. |
Sharingour HOME 
Categories
All
|